A suite of simple, speedy, and sophisticated systems that are set to satisfy even the most selective shooters, no matter their specialty!
Click Here to View a Printable Guide
Opening a Now Candid Account
- Go to https://www.nowcandid.com/
- Click "Open an Account" in the upper right corner
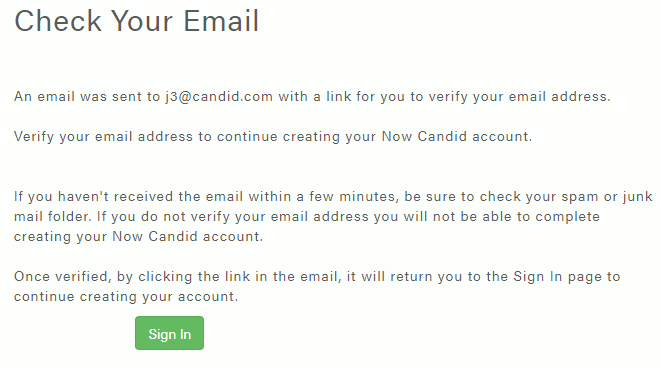
- Create Your Login
- Check Your Email (may take up to 20 minutes to receive email)
- Fill in your Business and Contact information
- This information will display on the retail website where your customers will view and order photos
- This information will display on the retail website where your customers will view and order photos


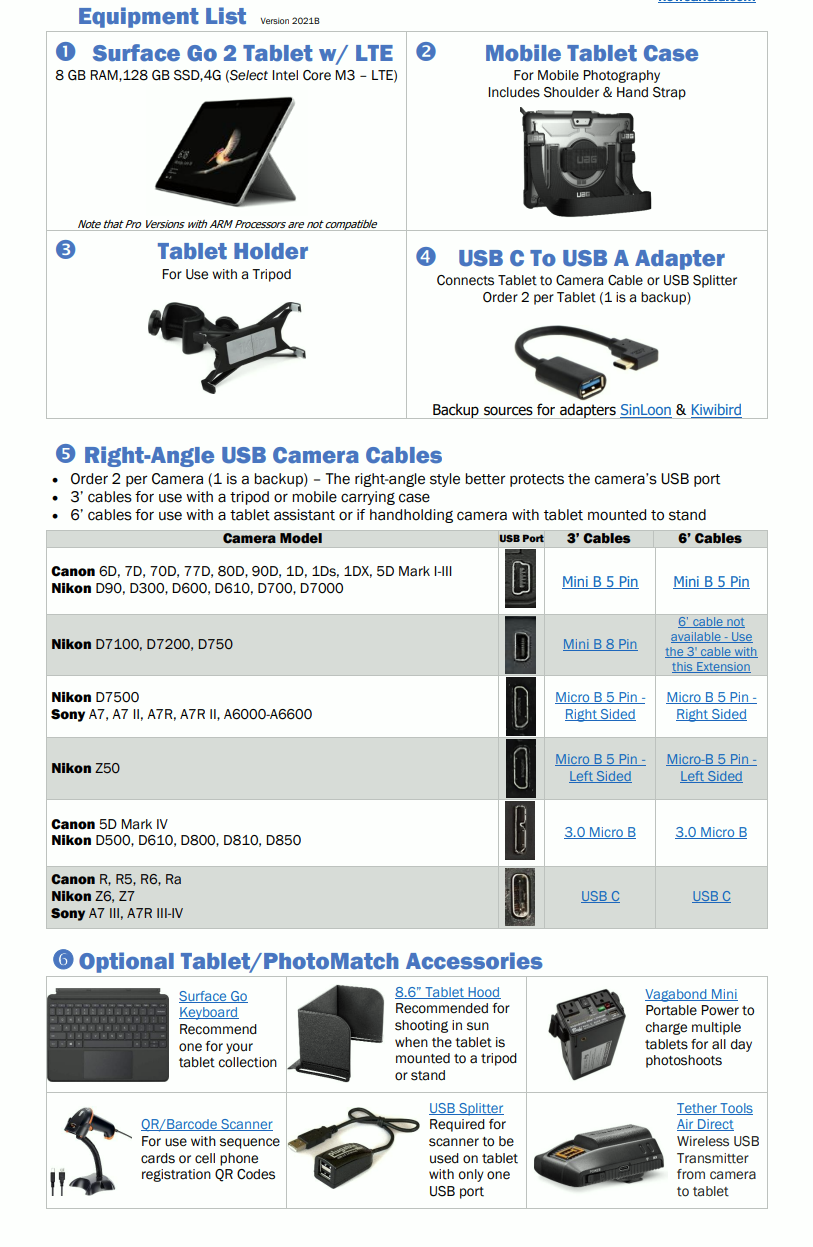
Recommended Equipment
-
Log into your account and click on "Getting Started"
-
Under Equipment, click "View Equipment" to open the equipment list
-
We highly recommend you use tablets with an LTE connection
-
LTE means it accommodates a SIM card like your cell phone for an internet connection.
-
SIM cards and data plans are sold separately. We recommend you shop for plans that work best in your area. Example: ATT, T-Mobile, GoogleFi, Etc.
-
-
-
Hyperlinks on the equipment list will direct your to our recommended vendor for purchase.
-

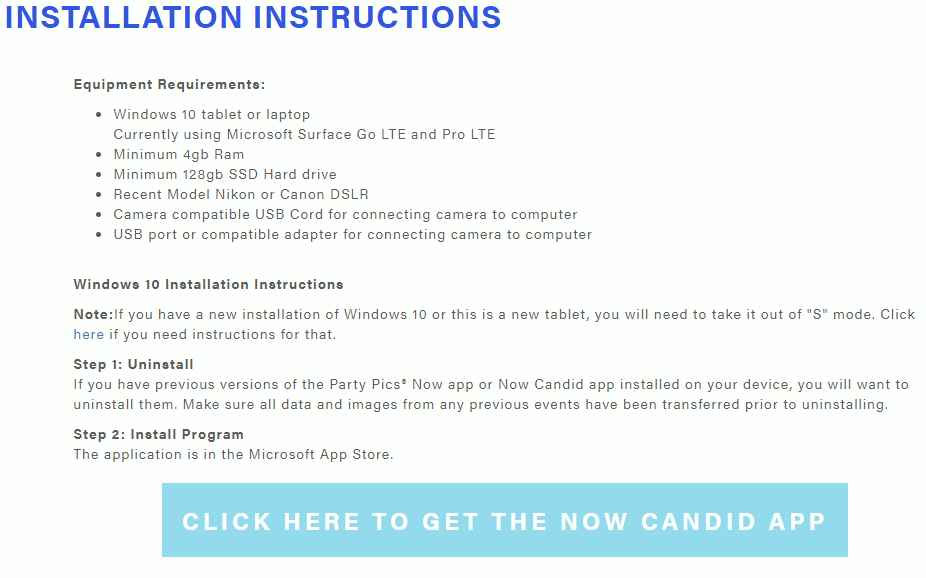
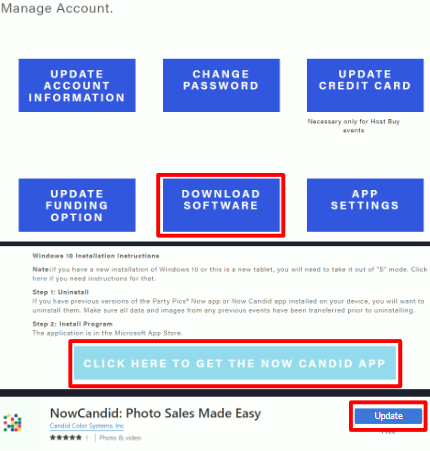
Setting Up Your Tablet
- Open your tablet and go to https://www.nowcandid.com/ and log into your account
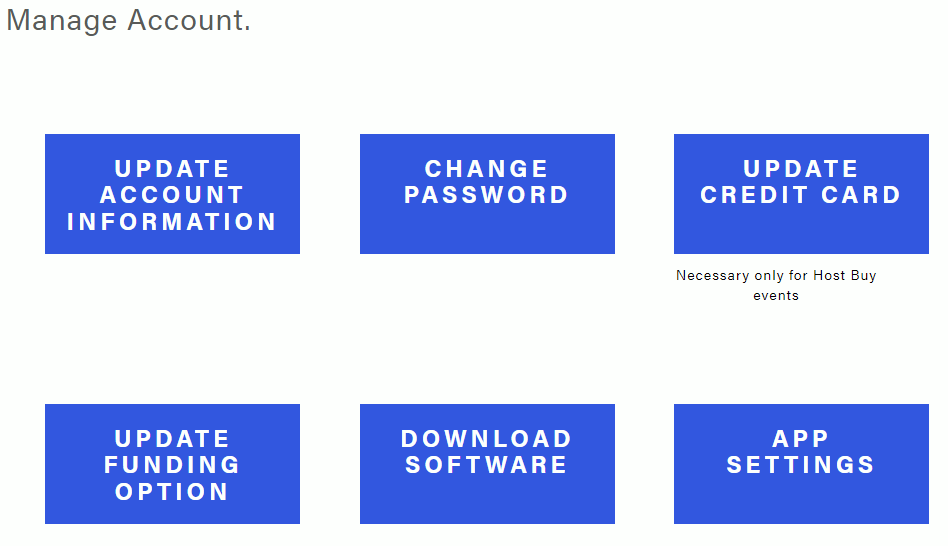
- In the upper right corner, click on your email address
- Under Manage Account click on the "Download Software" button
- Scroll down and click on the "Click here to get the Now Candid App"
- You'll be redirected to the Microsoft App Store
- Click "Get in Store App"
- Click "Install"
- We recommend pinning the App to your Taskbar for easy access later
- Scroll down and click on the "Click here to get the Now Candid App"
- Return to https://www.nowcandid.com/ under Manage Account and click "App Settings"
- Here you can change your passcode.
- The passcode is used by the photographer to log into the app on the tablet.
- Here you can change your passcode.


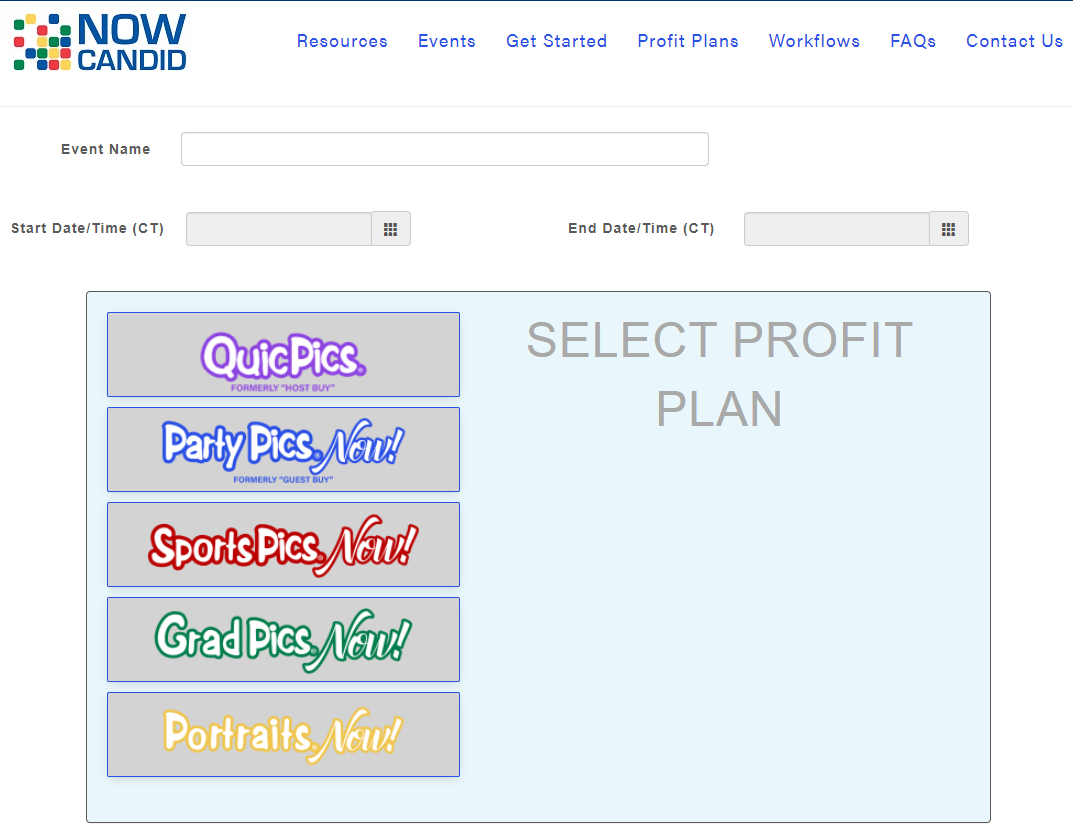
Creating An Event
-
Log into your account on https://www.nowcandid.com/
-
Click on "Events"
-
Click on the "Create New Event" button

-
Enter your Event Name
-
Enter the Event Start Date and Time (Central Time) (we recommend setting the start time 2 hours before actual start time, so you can test your event settings before getting started at the event.)
-
Enter the Event End Date and Time (Central Time) (we recommend the end date/time be at least 24 hours after the actual end date/time, can be up to 80 hours after start date/time. Face recognition ends on the event end date/time)
-
Select which Now App you'd like to use for the event
-
Select your product offer price level
-
Select if you would like to use selfie registration
-
Click Continue

-
Select your title option and enter or upload your title (depending on your selection)
-
Save Changes

-
After saving i will display a sample rendering of your title choice.
Shooting Workflows/Methods
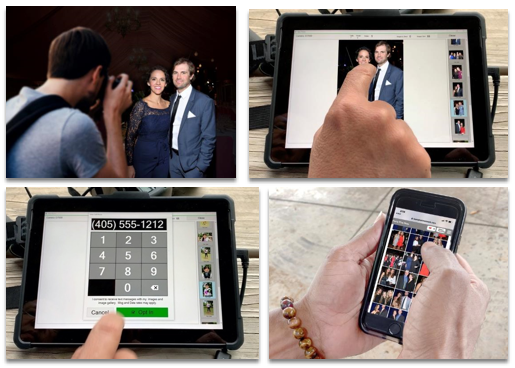
Tap-a-Face
- Tablet required
- Cell phone numbers and/or email addresses can be collected after tapping a face
- Images are live uploaded during the event via tablet and added to a personal gallery that is texted to the guest
- Facial recognition means you only need to tap each guest’s face once at an event (even if they already tapped in info on another tablet at the event)
- Display modes for both solo photography and photography with an assistant
Selfie Registration
- Tablet optional, but recommended
- A generic event QR code is generated during event creation when “enable selfie registration” is selected, right click it to save to device
- QR code can be scanned by subjects before, during, or after (within 80 hours) the event
- QR code directs to a Selfie Registration form where subjects input info & upload a selfie
- Facial recognition will match event images to each subject’s selfie, placing it in their gallery
- Images can be live uploaded during the event via tablet or manually uploaded after the event via nowcandid.com
- Collects name, cell, & email for the subject as well as their friends and family (if they choose to include them)
Scanner Identification (Coming Soon)
- Tablet & Scanner required
- Cell phone numbers and email addresses are collected when each subject scans a unique QR code with their phone
- Subject’s QR code is scanned by the photographer with the scanner before taking photos
- Images are live uploaded during the event via tablet and added to a personal gallery that is texted to the subject
- After the event, the QR code will direct to the associated personal gallery
Roster & Face Import (Coming Soon)
- Tablet optional, but recommended
- The photographer can import a roster & faces to be used as facial recognition profiles for Now Candid events
- The photographer can also export info & faces from one Now Candid event to be imported into other Now Candid events
- The facial recognition profiles can be edited and updated by the photographer to keep them current over time
- Overall, this has similar functionality to our other workflows, but it does not require data collection from the subjects for the event


Image Size
- We recommend shooting basic small. A small JPEG size is plenty large enough to be produced as a digital download or physical product within our system.
- Shooting in a high resolution or in RAW can cause issues when trying to upload images via tablet or manually via nowcandid.com’s uploader.
Post Event Marketing
- Marketing begins as soon as event images are uploaded and paired to contact data.
- Subjects will no longer receive marketing once they have made a purchase in the event.
- Subjects are “opting in” when they tap their face or selfie register, and can stop marketing at any time.
- Marketing corresponds with weekly price increases for the first 3 weeks following an event.
- All images are watermarked with scrolling and static copyright & proof watermarks (except for images in QuicPics).


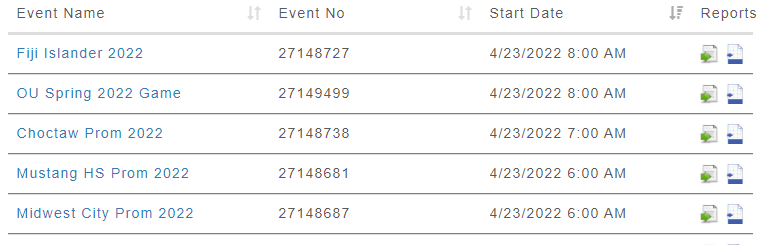
Event Reporting
- From your event management page, you can view and search events and open reports.
- The green button downloads the contact info you collected for the event as an excel sheet.
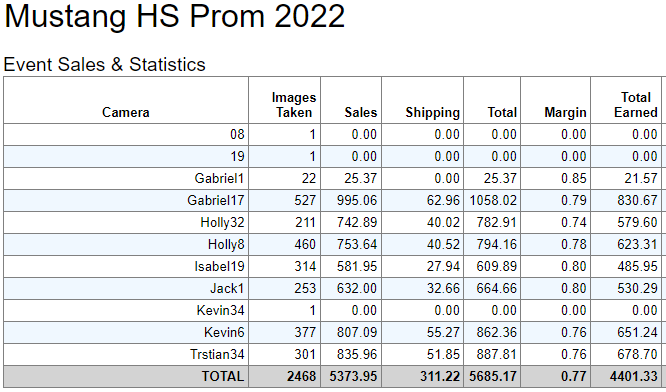
- The blue button displays live sales data for the event, breaking it down by each image folder.
- “Margin” is determining your actual margin of profit after accounting for your selected margin & the always 85% digital download margin.
- Emails are also sent to the main address on the account detailing each sale that occurs.
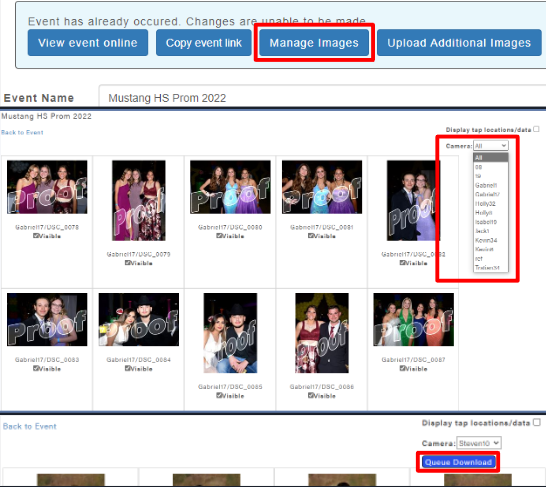
Event Management
- Select “Manage Images” while in a nowcandid.com event to view images from the event.
- Images can be sorted by folder, tap locations can be displayed, and images can be marked invisible or visible to determine whether they are on the retail site for purchase.
- Manage Images can be used to monitor an event live, as the images will populate quickly after being uploaded.


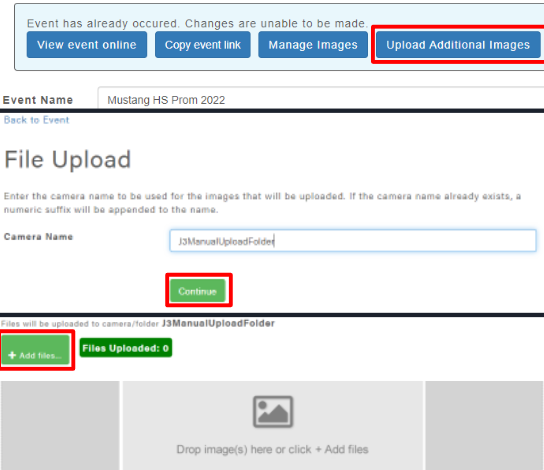
Uploading Images After They Are Taken via NowCandid.com
- In your Now Candid event, select “Upload Additional Images” to manually add images to your event from your device without a tablet.
- The name of the folder will appear in the Event Sales & Statistics reporting window.
- Images added this way will run through facial recognition if the event has not ended yet.
- Once images match to facial recognition profiles within the event, they will appear in personal galleries and marketing will begin (if it has not already started).
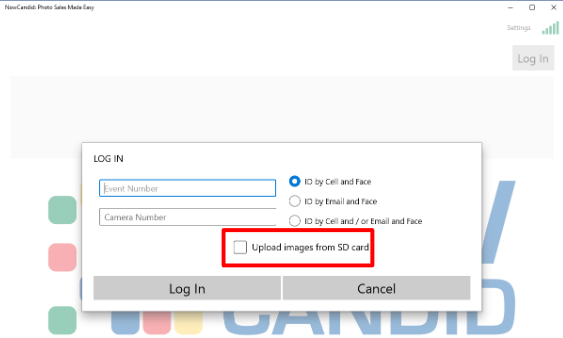
Uploading Images After They Are Taken via the Now App on the Tablet
- Images can also be manually uploaded to an event via the Now Candid Microsoft App.
- By checking the “Upload Images From SD Card” box when logging into your event, the app will upload all images from the SD card in the camera to the event.
- Ex: If only one tablet at an event but multiple shooters, swap SD cards at the end of the event, log out of your event, and log back in with the box checked to upload those images to the event as well.
NowCandid Customer Service
- Candid Color Systems’ support department will rectify production mistakes and reship when necessary at no cost to the photographer.
- The support department will also field calls in situations where customers reach out trying to find their images or asking questions about their order.
- CCS Support is linked to the end consumer multiple times throughout the retail experience and the photographer can direct questions to CCS as well.
NowCandid Payout Schedule
- Any sales received and produced by CCS’ lab by Tuesday at midnight will be included in the week’s payout.
- Statements are produced and emailed to your account email address Wednesday morning.
- Direct deposits post at the photographer’s bank on Friday that same week.
- If ACH or Stripe is not set up by the time a statement is prepared, sales will be remitted via a physical check directed to the name and address on your account.
Updating the Now Candid App
- Return to the page where the app was first installed to update the Now Candid app to the newest version.
- Sometimes it is necessary to wait a moment for the Microsoft Store to see an update is available and change the button to “Update.”
- Your tablet’s settings can be set to auto update all apps (including Now Candid), but a device update could interrupt an event if the tablet is not updated beforehand.

Best for Social Events such as parties, proms, galas, fan photos and more
Uses Social-Oriented products, pricing and marketing
PartyPics Now offers 3 different workflows
- Tap-a-Face
- Selfie Registration
- Roster & Face Import
Tap-a-Face
Subjects are photographed, then on the tablet they "tap their face" and enter a cell phone and/or email address on at least one photo taken of them during the event. All other photos taken will look for the face they tapped on to link those photos into a personalized gallery. A link will be sent via email/sms text to the subject to view their photos.
Selfie Registration
Subjects scan a QR code or go directly to a registration site where they provide their email and/or cell number and upload a selfie. All photos taken during the event will run through our face match system to match the subjects selfie to the event photos. A link will be sent via email/sms text to the subject to view all their photos in their personalized gallery.
Roster & Face Import
This method allows you to utilize photos and contact information you may already have of the subjects. Example: If you are photographing a prom and you had previously photographed those students for the yearbook, you can import your roster with contact and image data along with a reference image to be used by face match to link images taken at the prom to the students. A link with be sent via email/sms text to the subjects to view their photos in their personalized gallery.

Best for Single Teams or when you would have time to log into a new event between teams
Uses Sports-Oriented products, pricing and marketing
SportPics Now offers 4 different workflows
- Scanner Identification
- Tap-a-Face
- Selfie Registration
- Roster & Face Import
Scanner Identification
This allows you to create a QR scan card that will be unique to each player. Parent or player can scan the QR to register. After registration, the photographer scans the card to identify the player to that code. After images are taken a link will be sent via email/sms text to the subjects personalized gallery.
Tap-a-Face
Subjects are photographed, then on the tablet they "tap their face" and enter a cell phone and/or email address on at least one photo taken of them during the event. All other photos taken will look for the face they tapped on to link those photos into a personalized gallery. A link will be sent via email/sms text to the subject to view their photos.
Selfie Registration
Subjects scan a QR code or go directly to a registration site where they provide their email and/or cell number and upload a selfie. All photos taken during the event will run through our face match system to match the subjects selfie to the event photos. A link will be sent via email/sms text to the subject to view all their photos in their personalized gallery.
Roster & Face Import
This method allows you to utilize photos and contact information you may already have of the subjects. Example: If you are photographing a prom and you had previously photographed those students for the yearbook, you can import your roster with contact and image data along with a reference image to be used by face match to link images taken at the prom to the students. A link with be sent via email/sms text to the subjects to view their photos in their personalized gallery.

Best use is for Graduation and/or Award Ceremonies
Uses Grad-Oriented products, pricing and marketing
GradPics Now offers 4 different workflows
- Selfie Registration
- Scanner Identification
- Tap-a-Face
- Roster & Face Import
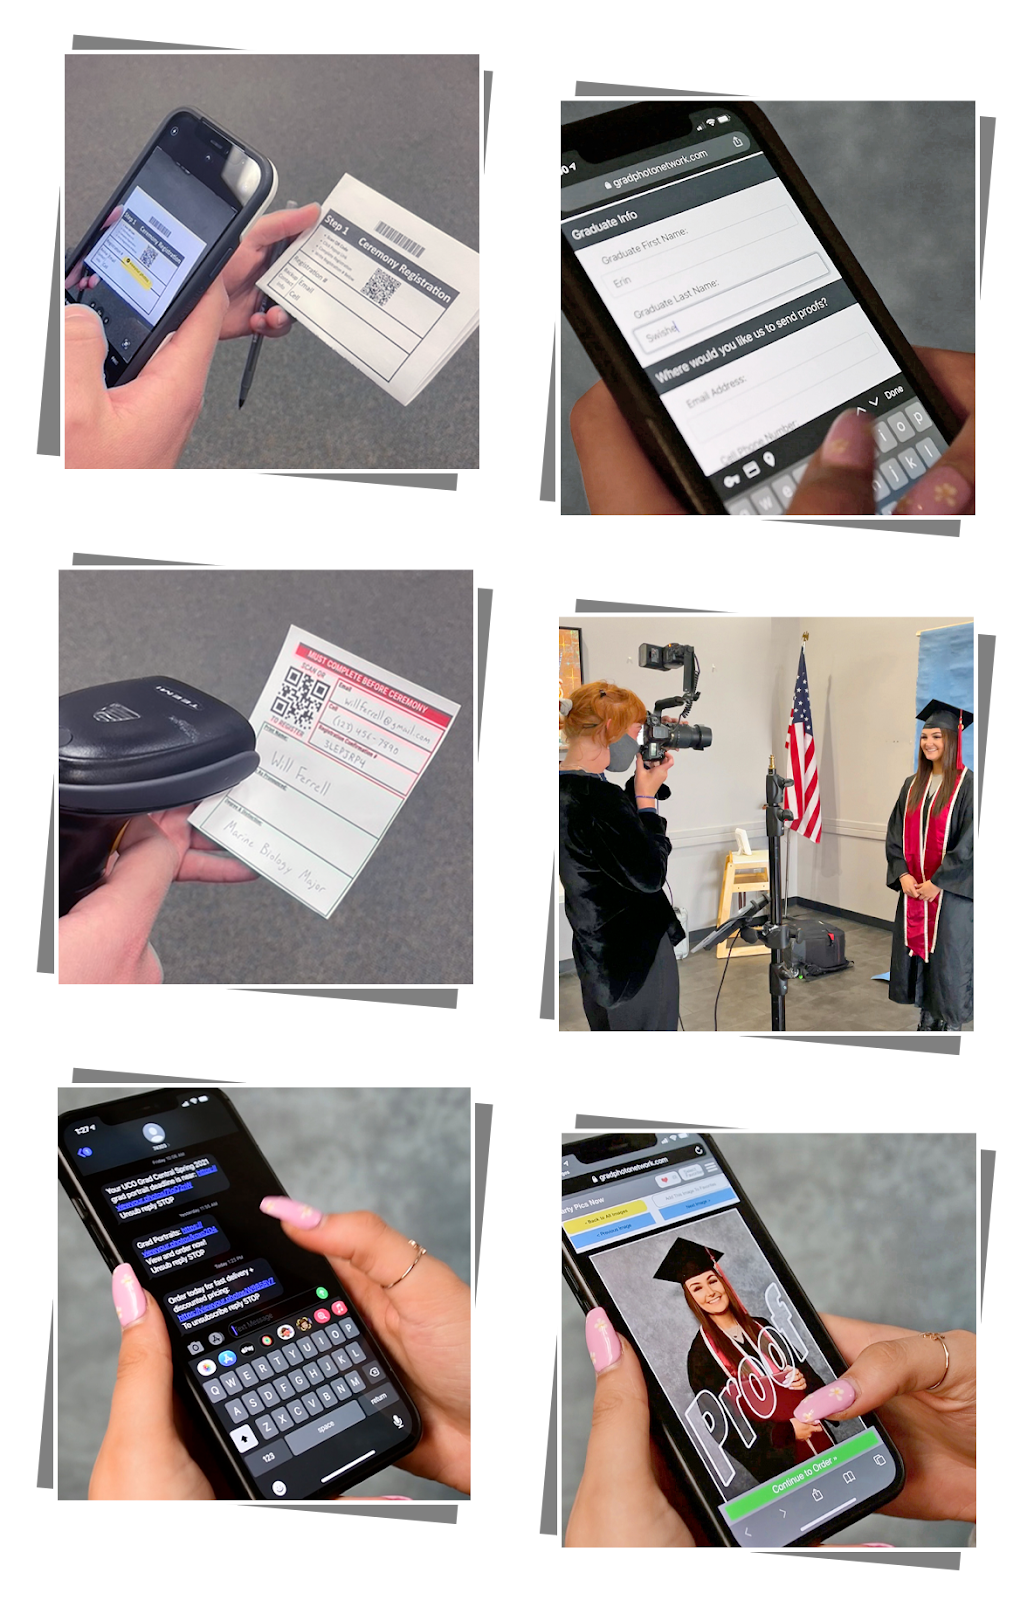
Selfie Registration
Subjects scan a QR code or go directly to a registration site where they provide their email and/or cell number and upload a selfie. All photos taken during the event will run through our face match system to match the subjects selfie to the event photos. A link will be sent via email/sms text to the subject to view all their photos in their personalized gallery.
Scanner Identification
This allows you to create a QR scan card that will be unique to each subject. Graduate can scan the QR to register. After registration, the photographer scans the card to identify the graduate to that code. After images are taken a link will be sent via email/sms text to the subjects personalized gallery.
Tap-a-Face
Subjects are photographed, then on the tablet they "tap their face" and enter a cell phone and/or email address on at least one photo taken of them during the event. All other photos taken will look for the face they tapped on to link those photos into a personalized gallery. A link will be sent via email/sms text to the subject to view their photos.
Roster & Face Import
This method allows you to utilize photos and contact information you may already have of the subjects. Example: If you are photographing a prom and you had previously photographed those students for the yearbook, you can import your roster with contact and image data along with a reference image to be used by face match to link images taken at the prom to the students. A link with be sent via email/sms text to the subjects to view their photos in their personalized gallery.

Best use is for Family, Business or Senior Portraits
Uses Portrait-Oriented products, pricing and marketing
Portraits Now offers 2 different workflows
Tablet Entry
This method does not use face recognition. It positively IDs data to images. The subject enters their name and contact data on the tablet, then all photos taken are placed in a private gallery specific to that individual or family. Best when you are photographing a single person or family that will share contact data.
Scanner Identification
This allows you to create a QR scan card that will be unique to each subject. Subject can scan the QR to register. After registration, the photographer scans the card to identify the subject to that code. After images are taken a link will be sent via email/sms text to the subjects personalized gallery. Best when you are doing portraits of multiple people that have different contact data.

Best for Social Events where the host is paying you and the guest will be texted all images taken of them.
There is a charge of $ .31 per image that you take. This covers the photos that will be texted to the subjects throughout the event.
Uses Social-Oriented products, pricing and marketing
QuicPics Now offers 3 different workflows
- Tap-a-Face
- Selfie Registration
- Roster & Face Import
Tap-a-Face
Subjects are photographed, then on the tablet they "tap their face" and enter a cell phone and/or email address on at least one photo taken of them during the event. All other photos taken will look for the face they tapped on to link those photos into a personalized gallery. A link will be sent via email/sms text to the subject to view their photos.
Selfie Registration
Subjects scan a QR code or go directly to a registration site where they provide their email and/or cell number and upload a selfie. All photos taken during the event will run through our face match system to match the subjects selfie to the event photos. A link will be sent via email/sms text to the subject to view all their photos in their personalized gallery.
Roster & Face Import
This method allows you to utilize photos and contact information you may already have of the subjects. Example: If you are photographing a prom and you had previously photographed those students for the yearbook, you can import your roster with contact and image data along with a reference image to be used by face match to link images taken at the prom to the students. A link with be sent via email/sms text to the subjects to view their photos in their personalized gallery.
Additional Features
- Available on QuicPics Only
- Head to manage images, select a folder, and the “Queue Download” option becomes available.
- Download all your event images with the event graphic on them to send to the event organizer when needed.
- Images with the graphic can be downloaded for free from the event link if they were not texted to an individual, but it is time consuming to do this for more than a few images.