
SNAP is the program that is used to upload images while you are taking photos or after. Follow the instructions below to download and install SNAP.
Steps for Installing SNAP the first time
- Go to this article on your tablet (so it's easier to jump to instructions and install files)
- Click here to locate the SNAP install file and click to download
- Once the install file downloads, click on it to open and install SNAP by following the on screen prompts.
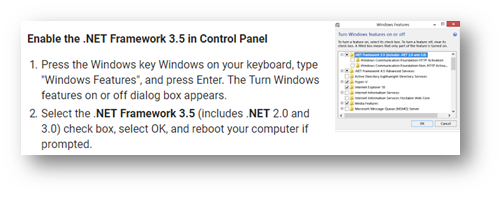
- If you get a message about .NET Framework 3.5 you need to enable or possibly install .NET 3.5 Framework (Link to download .net framework 3.5)
- If you don't get a message, you can skip this step
- Once installed locate the program and set to run as an administrator
- Find SNAP. (either via the Start menu bar or in a folder).
- Right click and open the properties menu. ...
- Click "Compatibility" ...
- Find the "Privilege" level option. ...
- Change to run as admin for all users. ...
Steps for Updating SNAP to the lastest version
Step 1: Run Windows updates (click for instructions)
- When you think you are finished with Windows updates, search for updates one more time (especially if you were more than a month behind on updates)
Step 2: Uninstall SNAP
- Click on your windows icon in your taskbar.
- In the search type "Add or Remove", when it appears, click on Add or remove programs
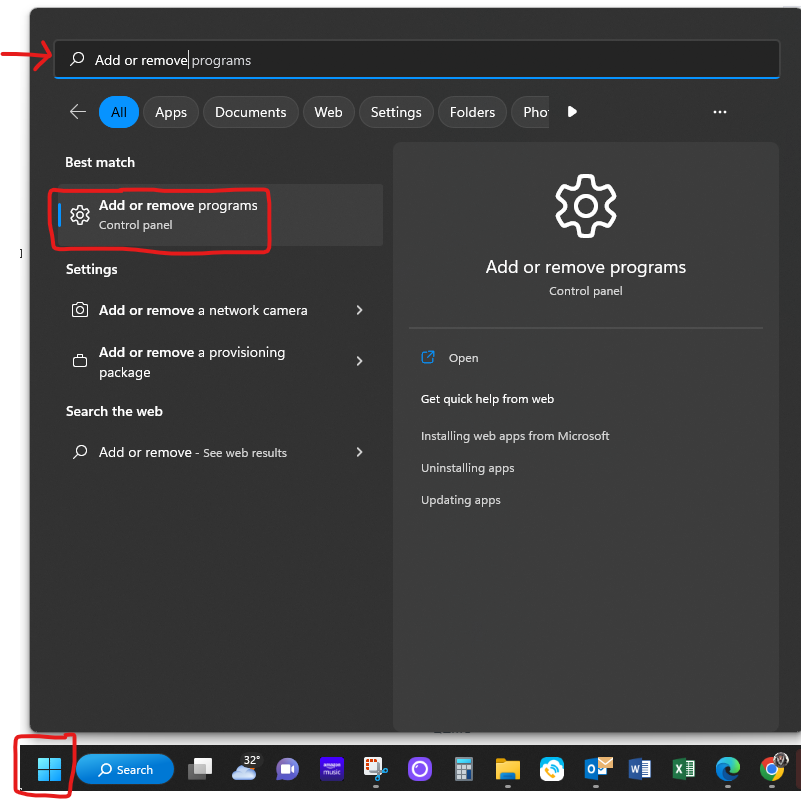
- Locate SNAP in the programs list and click uninstall
- Wait for the uninstall to complete
Step 3: Install the new version of SNAP
- Click here to download SNAP
- Once downloaded, click on the file to install and follow on screen prompts
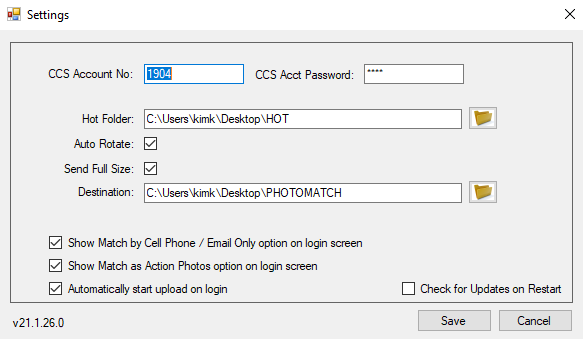
Step 4: Open PhotoMatch and Confirm your settings
- Go to the settings page by clicking the Setting Button
-
- Enter “CCS Account Number” and “CCS Account Password” in applicable fields.
- This is the password used to access your reporting site, NOT your CORE login and password.
- Click the browse icon to the right of "Hot Folder", then select the "Hot" folder your setup on the desktop in step 5.
- Check “Auto Rotate”
- Check “Send Full Size”
- Click the browser icon to the right of “Destination”, then select the “PhotoMatch” folder that was created on the desktop in step 5.
- Optionally select the “Show Match by Cell Phone Only Option on Login Screen” checkbox if taking candid photos and matching images to cell phones ONLY.
- Optionally select the “Show Match as Action Photos Option on Login Screen” checkbox if bulk ID’ing images to a division as action.
- Optionally select the “Automatically Start Upload on Login” checkbox if uploading images on-site automatically.
- You will still be able to upload images on-site by selecting the “Start Upload” tab in PhotoMatch, even if this option is NOT selected.
- Once all selections have been made, click the “Save” tab at the bottom of the pop-up screen.
- If you utilize multiple account numbers, the account number and password will need to be entered each time the photographer logs into an event on a different account.
- Enter “CCS Account Number” and “CCS Account Password” in applicable fields.
Step 5: Restart your computer/tablet